DO NOT MISS
>>Follow our Facebook page for updates! >>Join our Craftwell Design Team: Apply Now!

June 27, 2023

DT: Hello Sunshine Mixed Media Canvas


Hi, 

This is Veronica from vicky's scrapping passion, sharing with you my next post for Craftwell. Currently, I'm spending some time in Galveston, Tx and decided to make a mixed media canvas as décor for our vacation home.

I used the sassy shell bag kit by Tonic, and since I was limited by what I brought, it was an easy choice for this cute canvas:


Steps:


First, I added some crumbled aqua tissue paper using Clear Tar Gel, Golden to a plain canvas. Usually, I use ModPodge for this step, but the gel worked just fine. Then, I used a Finnabair stencil to add some blue ink, ColorBox/ Graphic45 to the dried tissue. In the mean time, I died cut the shell images I wanted to used using my SNAP and the specialty cardstock included in the kit.


Then, I did the fun part of spraying with gold sparkle spray the wooden mermaid clip, and some punched sand dollar pieces. I also added some Crystal Drops accents to the wooden shells, which I also sprayed when the drops where dried.
Finally, I stamped the sentiment on watercolor paper using archival ink. I distressed the hand-tore edges with the sparkle spray using a brush.
I tore some leftover sand motive printed paper, and added the strips to the bottom of the canvas. When dried, I added some clear Crystal drops accents to represent waves.
I added a net wrapping I had from some fruits, and used glossy accents glue and 3D zots to glue every piece to the canvas. Once assembled, I added randomly Crystal Drops in blue and clear, and once the dried, I sprayed randomly with the gold sparkle spray, and added some sequins, Simon says stamps using clear gloss.

Some close-ups:

Here are some short videos showing more details:


Here is how the Mermaid clip works for adding a picture:


I am very happy with the final mixed media canvas and put it on a wall already.

Craftwell Tools


SNAP die cut machine

Other Companies:


Clear Tar Gel, Golden
Aqua tissue paper
5x7 Dollar Tree Canvas
Black Archival ink, CTMH
Bon Voyage Blue ink, ColorBox/ Graphic45
Sparkle Spray Cream Gold, Nuvo
Crystal Drops Midnight Blue, Nuvo
Crystal Drops Clear, Nuvo
Bindweed Wallpaper stencil, Finnabair 
Sentiment Stamp, Paper Wings Productions
Sand dollar punch, Martha Stewart 
Specialty sticky handmade paper
Sequins, Simon says stamps
Glossy Accents, Rangers
3D Zots


 I hope you enjoy it this fun project and please follow my blog as well: vicky's scrapping passion.


Stay cool this hot June

Vicky Tovar


June 12, 2023

Happy Birthday

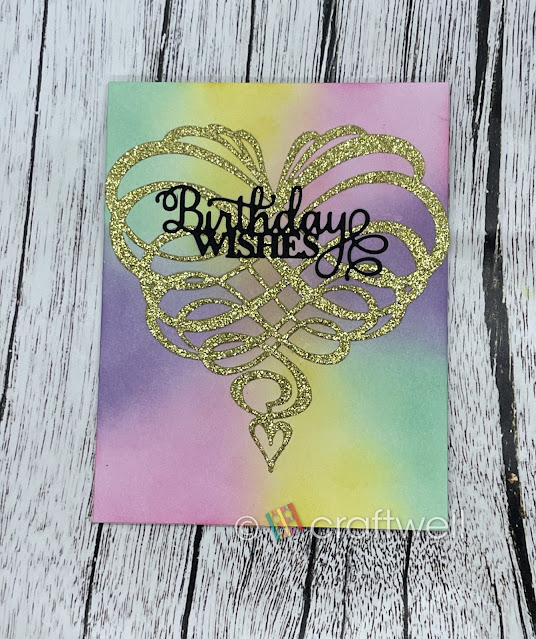
Hello everyone! This is Berina here, with a quick and simple birthday card perfect for a girl!


My daughter had a My Little Pony themed birthday and I wanted to make a card using the beautiful colors. So I inked the card base with light pink, purple, yellow and mint in a alternate fashion in diagonal. Then I die cut Spellbinders - Amazing Paper Grace - Swirl Heart on a gold glitter card stock and adhered it on to the card base. I die cut the sentiment using Creative Expressions - Belated Birthday Wishes die on black card stock and snipped off the 'belated'. I used SNAP to die cut.

I didn't know what to expect when I thought about making this card, but I do like how it turned out. What do you think? Do let me know. Thanks for stopping by. Have a great day!

-Berina


June 9, 2023

Airbrush Pattern Planter

Happy Friday!!

Katie here with another fun airbrushed planter project. Great project on your own or with kids.

Also could make for a nice gift with a plant.


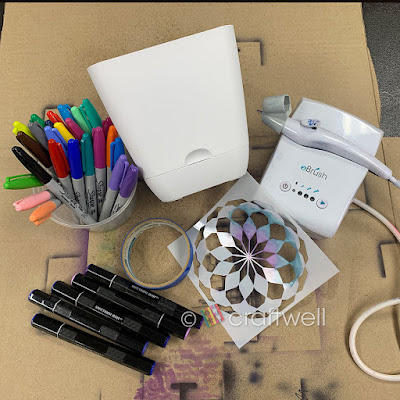
Materials

Craftwell eBrush Airbrush System

Sharpie markers

Spectrum Noir markers

Medium size plastic planter from Target

Pattern stencils from Amazon

Painter's tape

Disposable gloves (optional)


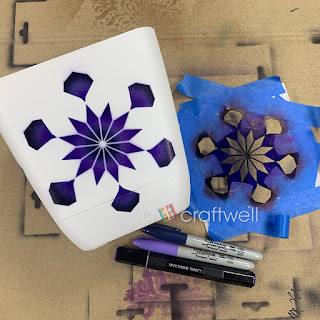
I kept it simple by just using one stencil and keeping the colors in shades of blue and purple.

Very important: always test your colors before using to make sure it's what you want.

Since I didn't want to use the whole pattern design, I use the painter's tape to cover up the parts I didn't want and position however I want. That's the fun part, you can create however you want and wherever on the planter.

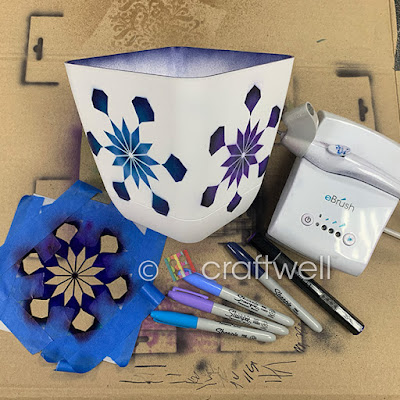
Went with the idea of positioning the pattern differently and making gradients with the colors I chose as well. Below you can see how they came out.


To add a little something, I airbrushed the inside of the planter and you could do the same or even make a pattern there as well.


I hope everyone liked my planter project and got inspired.

Until next time!

- Katie

May 26, 2023

DT: Telephone Box Card


Hi, 

This is Veronica from vicky's scrapping passion, sharing with you my next post for Craftwell. For this post I decided to make a Telephone booth box card for my son's 16th birthday. He is wanting a phone for a while, but he didn't have the real need for it and we are delaying the social media as long as we can. Thus, I decided to play a trick on him.

When I saw the terrific telephone treat box kit by Tonic, I knew that it was the perfect die for what I had in mind. I love the English Telephone booth and the color combination is just perfect. This die is meant for a treat box, so I tweaked it a little to make it a box card, by trimming the topper and glue it directly to the top flap.

Some tips to work with this dies:

Use the foam tape included to hold the dies in the acetate to hold in place when die cutting the sentiments inside the rectangle:

\

I cut an strip large enough to add the "16" crown as a popup element, but forgot to add the extra fold to make it pop up on its own:


This box is so cute that can also hold a tea light LED candle inside:


I was able to fold the box car to put it inside of an envelop with a note, "Enjoy your phone":


Here is my son reaction to the card:


At the end, I decided to make the little base included in the kit to use as cake topper as well:


I followed all the amazing instructions included with these dies and kit. This is the first kit that includes such detailed instructions; no need to hunt for videos in the web. Love it

Craftwell Tools


SNAP die cut machine

Other Companies:


Sizzix Thinlits Die Set 3PK - Mixed Media #3 by Tim Holtz


 I hope you enjoy it this fun project and please follow my blog as well: vicky's scrapping passion.


Happy end of May

Vicky Tovar


May 19, 2023

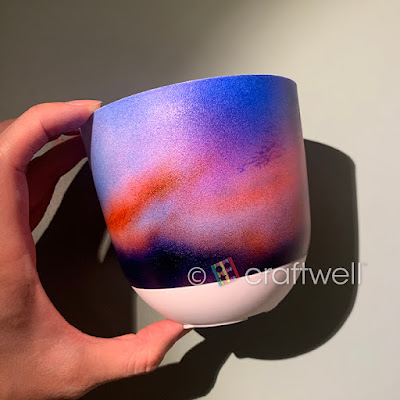
Airbrushed Planter

 Hi All!

Katie here with another fun project using Craftwell's eBrush Airbrush System. 

Taking a plain plastic planter and making it your own. A fun project for kids or by yourself.


Materials

Craftwell eBrush Airbrush System

Sharpie Markers

Spectrum Noir Markers

Small Plastic Planter from Target ($3 for 2)

Painter's Tape

Inspirational Photo (optional)


I couldn't decide on what to airbrush the planter and went with a photo of a sunset as my inspiration. That photo is above.

First off I taped off the selection I didn't want to get color. My strategy was to start with lighter colors and work myself to the darker ones or I would reverse. Do what you feel would work for you because honestly you might have a different approach. 

Used a mix of Sharpie and Spectrum Noir markers because I might not have the right shade of color and will use two different brands of markers.


Below you can see what airbrushing looks like and I'm happy with the result.


I hope everyone enjoyed my project and I'll airbrush a few more planters for those plant lovers out there.
I'm open to suggestions what designs I should airbrush on them.

Until next time! Happy crafting.

- Katie

May 8, 2023

Birthday Orchids

Hello everyone! This is Berina here today, with a beautiful floral birthday card that I made for my daughter's birthday recently. If you've seen my posts, you probably know I love floral cards especially adding 3 dimensional flowers. Orchids are one of the most beautiful flowers, my grandmother had a lot of them in her house.


I started by making the beautiful orchids. The dies are from one of Susan's Garden older set called Cattleya Orchids. I die cut them on my Craftwell SNAP. I used my Copics to add some shading to the die cuts before shaping them and putting them together. I die cut some oval pieces in white and purple and adhered the orchids and leaves to it. Added a simple birthday sentiment from an old Verve stamp set. 

What do you think about this card? Please do let me know. Thanks for stopping by. Have a great day!

-Berina

April 26, 2023

DT: Fiesta Medals/ Ribbons and Fiesta Earrings


     Hi, 

This is Veronica from vicky's scrapping passion, sharing with you my next post for Craftwell. For this post I decided to use my several Fiesta stamps and dies to create shrink plastic charms for fiesta ribbons and earrings:

First, I used the colorful flower gift bows from the Dollar Tree and complimented them with the tail parts of the Ribbon Rosette Die & Stamp Showcase Set, Tonic Studio. I also used the banner and trophy die (which I cut to just show the No. 1 part) out of gold paper.

I used Spectrum Noir alcohol markers to highlight the embossed No. 1 sentiment and created a 2 for the other two ribbons. It is hard to see that part in the picture below, but I did trim the center part to show them later on (above picture).

The ribbons looked kind of plain, so I decided to stamp charms using my HeroArts and FSJ fiesta sets on printable shrink plastic (Sizzix, on the white/ rough side) and then die cut them with the respective die. My daughter helped me color the stamped images using gel pens and metallic/ glitter markers. Then, I punched a hole in each die cut and attached the rings. I, then, used my heat gun to shrink the plastic- scary step as it curls totally up until it reaches its final size where it flattened back. If not perfect continue melting and turning back and fort until nice and straight:

Sadly the metallic/ glitter part doesn't show on the shiny side of the charm:


Here, a closer look of each fiesta charm pair:


And finally, the fiesta chihuahuas were so cute that I made earrings out of the charms:


and on the ribbons, I added two or just one charm:


Craftwell Tools


SNAP die cut machine

Other Companies:


FSJ black licorice ink
CTMH Cardstock white 
Gold paper, IKEA

 I hope you enjoy it this fun project and please follow my blog as well: vicky's scrapping passion.


Happy April

Vicky Tovar


'
 
Copyright © 2014 Craftwell Blog. Designed by OddThemes - Published By Gooyaabi Templates